 01.gin源码
# 00.前置知识
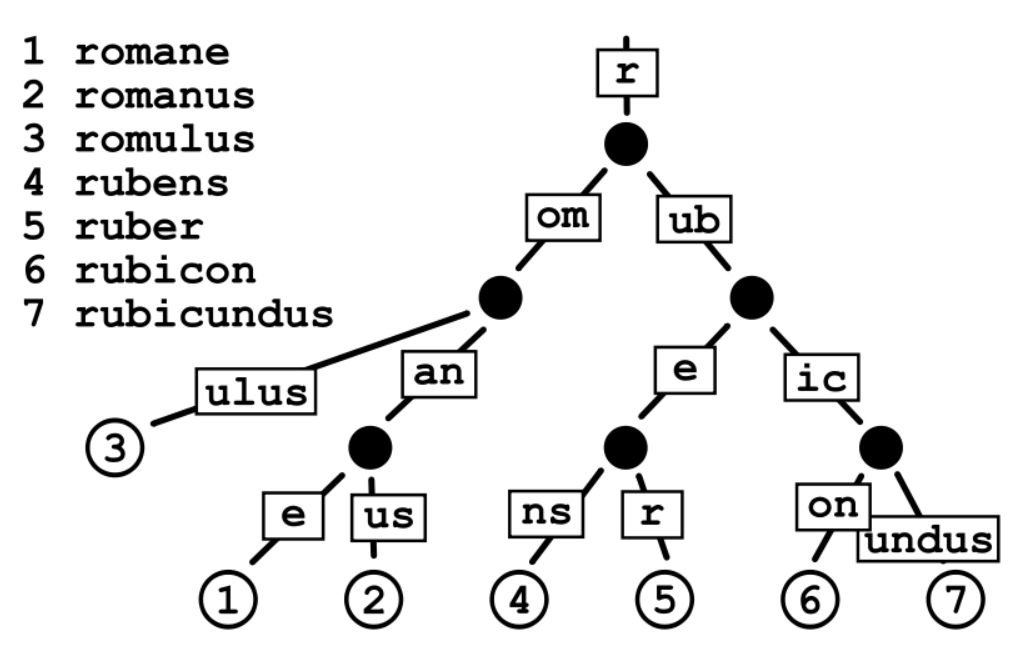
# 0.1 基数树(Radix Tree)
Radix Tree可以被认为是一棵简洁版的前缀树。我们注册路由的过程就是构造前缀树的过程,具有公共前缀的节点也共享一个公共父节点
由于URL路径具有层次结构,并且只使用有限的一组字符(字节值),所以很可能有许多常见的前缀。
这使我们可以很容易地将路由简化为更小的问题。
gin中,路由器为每种请求方法管理一棵单独的树。
# 0.2 net/http
- Go语言内置的
net/http包十分的优秀,提供了HTTP客户端和服务端的实现 - ListenAndServe使用指定的监听地址和处理器启动一个HTTP服务端。
- 处理器参数通常是nil,这表示采用包变量DefaultServeMux作为处理器。
package main
import (
	"fmt"
	"net/http"
)

func sayHello(w http.ResponseWriter, r *http.Request) {
	fmt.Fprintln(w, "Hello World!")
}

func main() {
	http.HandleFunc("/", sayHello)
	err := http.ListenAndServe(":9090", nil)
	if err != nil {
		fmt.Printf("http server failed, err:%v\n", err)
		return
	}
}
2
3
4
5
6
7
8
9
10
11
12
13
14
15
16
17
18

# 0.3 运行gin服务
创建一个测试项目
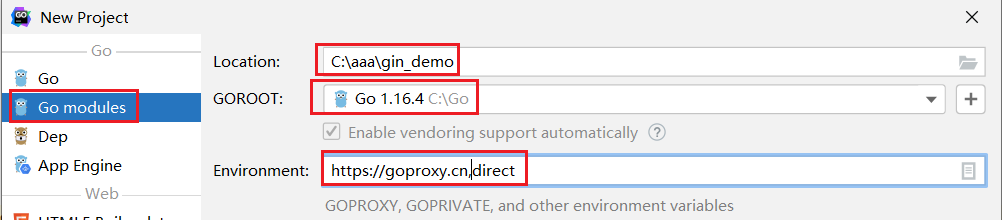
gin服务代码
C:\aaa\gin_demo> go mod tidy // 更新依赖包
package main
import "github.com/gin-gonic/gin"

func main() {
	r := gin.Default()
	r.GET("/ping", func(c *gin.Context) {
		c.JSON(200, gin.H{
			"message": "pong",
		})
	})
	r.Run()  // listen and serve on 0.0.0.0:8080 (for windows "localhost:8080")
}
2
3
4
5
6
7
8
9
10
11
12
- 运行效果

# 0.4 gin核心概念
Engine容器对象,整个框架的基础Engine.trees负责存储路由和handle方法的映射,采用类似字典树的结构Engine.RouterGroup,其中的Handlers存储着所有中间件Context上下文对象,负责处理请求和回应,其中的handlers是存储处理请求时中间件和处理方法的
# 01.第一步: 初始化容器
1)初始化容器流程
- 通过调用
gin.New()方法来实例化Engine容器. - 虽然参数很多,但我们只需要注意
RouterGroup,trees和engine.pool.New即可 engine.pool.New负责创建Context对象,采用sync.Pool减少频繁context实例化带来的资源消耗
- 通过调用
2)Engine说明
在整个gin框架中最重要的一个struct就是Engine, 它包含路由, 中间件, 相关配置信息等.
Engine的代码主要就在gin.go中
Engine中比较重要的几个属性, 其他的属性暂时全部省略掉
   type Engine struct {
       RouterGroup // 路由
       pool             sync.Pool  // context pool
       trees            methodTrees // 路由树
       // html template及其他相关属性先暂时忽略
   }
1
2
3
4
5
6Engine有几个比较主要的函数
New(), Default()
# 1.1 先看 gin.Default()
- Default()跟New()几乎一模一样, 就是调用了gin内置的Logger(), Recovery()中间件.
func Default() *Engine {
	debugPrintWARNINGDefault()
	engine := New()
	engine.Use(Logger(), Recovery())
	return engine
}
2
3
4
5
6
# 1.2 engine := New() 初始化
- 通过调用
gin.New()方法来实例化Engine容器. - 1.初始化了Engine
- 2.将RouterGroup的Handlers(数组)设置成nil, basePath设置成
/ - 3.为了使用方便, RouteGroup里面也有一个Engine指针, 这里将刚刚初始化的engine赋值给了RouterGroup的engine指针
- 4.为了防止频繁的context GC造成效率的降低, 在Engine里使用了sync.Pool, 专门存储gin的Context
func New() *Engine {
	debugPrintWARNINGNew()
   // Engine 容器对象,整个框架的基础
	engine := &Engine{     // 初始化语句
       // Handlers 全局中间件组在注册路由时使用
		RouterGroup: RouterGroup{  // Engine.RouterGroup,其中的Handlers存储着所有中间件
			Handlers: nil,
			basePath: "/",
			root:     true,
		},
		FuncMap:                template.FuncMap{},
		RedirectTrailingSlash:  true,
		RedirectFixedPath:      false,
		HandleMethodNotAllowed: false,
		ForwardedByClientIP:    true,
		RemoteIPHeaders:        []string{"X-Forwarded-For", "X-Real-IP"},
		TrustedProxies:         []string{"0.0.0.0/0"},
		AppEngine:              defaultAppEngine,
		UseRawPath:             false,
		RemoveExtraSlash:       false,
		UnescapePathValues:     true,
		MaxMultipartMemory:     defaultMultipartMemory,
      // 树结构,保存路由和处理方法的映射
		trees:              make(methodTrees, 0, 9),
		delims:                 render.Delims{Left: "{{", Right: "}}"},
		secureJSONPrefix:       "while(1);",
	}
	engine.RouterGroup.engine = engine
	engine.pool.New = func() interface{} {
		return engine.allocateContext()
	}
	return engine
}
2
3
4
5
6
7
8
9
10
11
12
13
14
15
16
17
18
19
20
21
22
23
24
25
26
27
28
29
30
31
32
33
# 02.第二步: 注册中间件
# 2.1 engine.Use()
- gin框架中的中间件设计很巧妙,我们可以首先从我们最常用的
r := gin.Default()的Default函数开始看 - 它内部构造一个新的
engine之后就通过Use()函数注册了Logger中间件和Recovery中间件 - Use()就是gin的引入中间件的入口了.
- 仔细分析这个函数, 不难发现Use()其实是在给RouteGroup引入中间件的.
- 具体是如何让中间件在RouteGroup上起到作用的, 等说到RouteGroup再具体说.
func Default() *Engine {
	debugPrintWARNINGDefault()
	engine := New()
	engine.Use(Logger(), Recovery())  // 默认注册的两个中间件
	return engine
}
2
3
4
5
6
# 2.2 往下查看Use()函数代码
gin.use()调用RouterGroup.Use()往RouterGroup.Handlers写入记录
func (engine *Engine) Use(middleware ...HandlerFunc) IRoutes {
	engine.RouterGroup.Use(middleware...)
	engine.rebuild404Handlers() //注册404处理方法
	engine.rebuild405Handlers() //注册405处理方法
	return engine
}

//  其中`Handlers`字段就是一个数组,用来存储中间件
func (group *RouterGroup) Use(middleware ...HandlerFunc) IRoutes {
	group.Handlers = append(group.Handlers, middleware...)
	return group.returnObj()
}
2
3
4
5
6
7
8
9
10
11
12
- 而我们注册路由时会将对应路由的函数和之前的中间件函数结合到一起
func (group *RouterGroup) handle(httpMethod, relativePath string, handlers HandlersChain) IRoutes {
	absolutePath := group.calculateAbsolutePath(relativePath)
	handlers = group.combineHandlers(handlers)  // 将处理请求的函数与中间件函数结合
	group.engine.addRoute(httpMethod, absolutePath, handlers)
	return group.returnObj()
}
2
3
4
5
6
# 2.3 组成一条处理函数链条HandlersChain
- 其中结合操作的函数内容如下,注意观察这里是如何实现拼接两个切片得到一个新切片的
const abortIndex int8 = math.MaxInt8 / 2

func (group *RouterGroup) combineHandlers(handlers HandlersChain) HandlersChain {
	finalSize := len(group.Handlers) + len(handlers)
	if finalSize >= int(abortIndex) {  // 这里有一个最大限制
		panic("too many handlers")
	}
	mergedHandlers := make(HandlersChain, finalSize)
	copy(mergedHandlers, group.Handlers)
	copy(mergedHandlers[len(group.Handlers):], handlers)
	return mergedHandlers
}
2
3
4
5
6
7
8
9
10
11
12
- 也就是说,我们会将一个路由的中间件函数和处理函数结合到一起组成一条处理函数链条
HandlersChain - 而它本质上就是一个由
HandlerFunc组成的切片
type HandlersChain []HandlerFunc
# 2.4 中间件的执行
- 其中
c.Next()就是很关键的一步,它的代码很简单- 从下面的代码可以看到,这里通过索引遍历
HandlersChain链条 - 从而实现依次调用该路由的每一个函数(中间件或处理请求的函数)
- 从下面的代码可以看到,这里通过索引遍历
func (c *Context) Next() {
	c.index++
	for c.index < int8(len(c.handlers)) {
		c.handlers[c.index](c)
		c.index++
	}
}
2
3
4
5
6
7
我们可以在中间件函数中通过再次调用
c.Next()实现嵌套调用(func1中调用func2;func2中调用func3)或者通过调用
c.Abort()中断整个调用链条,从当前函数返回
func (c *Context) Abort() {
	c.index = abortIndex  // 直接将索引置为最大限制值,从而退出循环
}
2
3
c.Set()/c.Get()c.Set()和c.Get()这两个方法多用于在多个函数之间通过c传递数据的- 比如我们可以在认证中间件中获取当前请求的相关信息(userID等)通过
c.Set()存入c - 然后在后续处理业务逻辑的函数中通过
c.Get()来获取当前请求的用户 c就像是一根绳子,将该次请求相关的所有的函数都串起来了。
# 03.第三步: 注册路由
- 注册路由的逻辑主要有
addRoute函数和insertChild方法
# 3.1 注册路由动图
1、第一次注册路由,例如注册search
2、继续注册一条没有公共前缀的路由,例如blog
3、注册一条与先前注册的路由有公共前缀的路由,例如support

路由树节点- 路由树是由一个个节点构成的,gin框架路由树的节点由
node结构体表示
- 路由树是由一个个节点构成的,gin框架路由树的节点由
// tree.go

type node struct {
   // 节点路径,比如上面的s,earch,和upport
	path      string
	// 和children字段对应, 保存的是分裂的分支的第一个字符
	// 例如search和support, 那么s节点的indices对应的"eu"
	// 代表有两个分支, 分支的首字母分别是e和u
	indices   string
	// 儿子节点
	children  []*node
	// 处理函数链条(切片)
	handlers  HandlersChain
	// 优先级,子节点、子子节点等注册的handler数量
	priority  uint32
	// 节点类型,包括static, root, param, catchAll
	// static: 静态节点(默认),比如上面的s,earch等节点
	// root: 树的根节点
	// catchAll: 有*匹配的节点
	// param: 参数节点
	nType     nodeType
	// 路径上最大参数个数
	maxParams uint8
	// 节点是否是参数节点,比如上面的:post
	wildChild bool
	// 完整路径
	fullPath  string
}
2
3
4
5
6
7
8
9
10
11
12
13
14
15
16
17
18
19
20
21
22
23
24
25
26
27
28
# 3.2 addRoute构造路由树
- 这段代码就是利用method, path, 将handlers注册到engine的trees中.
- 注意这里为什么是HandlersChain呢, 可以简单说一下, 就是将中间件和处理函数都注册到method, path的tree中了.
// tree.go

// addRoute 将具有给定句柄的节点添加到路径中。
// 不是并发安全的
func (n *node) addRoute(path string, handlers HandlersChain) {
	fullPath := path
	n.priority++
	numParams := countParams(path)  // 数一下参数个数

	// 空树就直接插入当前节点
	if len(n.path) == 0 && len(n.children) == 0 {
		n.insertChild(numParams, path, fullPath, handlers)
		n.nType = root
		return
	}
	parentFullPathIndex := 0

walk:
	for {
		// 更新当前节点的最大参数个数
		if numParams > n.maxParams {
			n.maxParams = numParams
		}

		// 找到最长的通用前缀
		// 这也意味着公共前缀不包含“:”"或“*” /
		// 因为现有键不能包含这些字符。
		i := longestCommonPrefix(path, n.path)

		// 分裂边缘(此处分裂的是当前树节点)
		// 例如一开始path是search,新加入support,s是他们通用的最长前缀部分
		// 那么会将s拿出来作为parent节点,增加earch和upport作为child节点
		if i < len(n.path) {
			child := node{
				path:      n.path[i:],  // 公共前缀后的部分作为子节点
				wildChild:  n.wildChild,
				indices:    n.indices,
				children:   n.children,
				handlers:   n.handlers,
				priority:   n.priority - 1, //子节点优先级-1
				fullPath:   n.fullPath,
			}

			// Update maxParams (max of all children)
			for _, v := range child.children {
				if v.maxParams > child.maxParams {
					child.maxParams = v.maxParams
				}
			}

			n.children = []*node{&child}
			// []byte for proper unicode char conversion, see #65
			n.indices = string([]byte{n.path[i]})
			n.path = path[:i]
			n.handlers = nil
			n.wildChild = false
			n.fullPath = fullPath[:parentFullPathIndex+i]
		}

		// 将新来的节点插入新的parent节点作为子节点
		if i < len(path) {
			path = path[i:]

			if n.wildChild {  // 如果是参数节点
				parentFullPathIndex += len(n.path)
				n = n.children[0]
				n.priority++

				// Update maxParams of the child node
				if numParams > n.maxParams {
					n.maxParams = numParams
				}
				numParams--

				// 检查通配符是否匹配
				if len(path) >= len(n.path) && n.path == path[:len(n.path)] {
					// 检查更长的通配符, 例如 :name and :names
					if len(n.path) >= len(path) || path[len(n.path)] == '/' {
						continue walk
					}
				}

				pathSeg := path
				if n.nType != catchAll {
					pathSeg = strings.SplitN(path, "/", 2)[0]
				}
				prefix := fullPath[:strings.Index(fullPath, pathSeg)] + n.path
				panic("'" + pathSeg +
					"' in new path '" + fullPath +
					"' conflicts with existing wildcard '" + n.path +
					"' in existing prefix '" + prefix +
					"'")
			}
			// 取path首字母,用来与indices做比较
			c := path[0]

			// 处理参数后加斜线情况
			if n.nType == param && c == '/' && len(n.children) == 1 {
				parentFullPathIndex += len(n.path)
				n = n.children[0]
				n.priority++
				continue walk
			}

			// 检查路path下一个字节的子节点是否存在
			// 比如s的子节点现在是earch和upport,indices为eu
			// 如果新加一个路由为super,那么就是和upport有匹配的部分u,将继续分列现在的upport节点
			for i, max := 0, len(n.indices); i < max; i++ {
				if c == n.indices[i] {
					parentFullPathIndex += len(n.path)
					i = n.incrementChildPrio(i)
					n = n.children[i]
					continue walk
				}
			}

			// 否则就插入
			if c != ':' && c != '*' {
				// []byte for proper unicode char conversion, see #65
				// 注意这里是直接拼接第一个字符到n.indices
				n.indices += string([]byte{c})
				child := &node{
					maxParams: numParams,
					fullPath:  fullPath,
				}
				// 追加子节点
				n.children = append(n.children, child)
				n.incrementChildPrio(len(n.indices) - 1)
				n = child
			}
			n.insertChild(numParams, path, fullPath, handlers)
			return
		}

		// 已经注册过的节点
		if n.handlers != nil {
			panic("handlers are already registered for path '" + fullPath + "'")
		}
		n.handlers = handlers
		return
	}
}
2
3
4
5
6
7
8
9
10
11
12
13
14
15
16
17
18
19
20
21
22
23
24
25
26
27
28
29
30
31
32
33
34
35
36
37
38
39
40
41
42
43
44
45
46
47
48
49
50
51
52
53
54
55
56
57
58
59
60
61
62
63
64
65
66
67
68
69
70
71
72
73
74
75
76
77
78
79
80
81
82
83
84
85
86
87
88
89
90
91
92
93
94
95
96
97
98
99
100
101
102
103
104
105
106
107
108
109
110
111
112
113
114
115
116
117
118
119
120
121
122
123
124
125
126
127
128
129
130
131
132
133
134
135
136
137
138
139
140
141
142
# 3.3 insertChild
insertChild函数是根据path本身进行分割,将/分开的部分分别作为节点保存,形成一棵树结构。- 参数匹配中的
:和*的区别是,前者是匹配一个字段而后者是匹配后面所有的路径。
// tree.go
func (n *node) insertChild(numParams uint8, path string, fullPath string, handlers HandlersChain) {
  // 找到所有的参数
	for numParams > 0 {
		// 查找前缀直到第一个通配符
		wildcard, i, valid := findWildcard(path)
		if i < 0 { // 没有发现通配符
			break
		}

		// 通配符的名称必须包含':' 和 '*'
		if !valid {
			panic("only one wildcard per path segment is allowed, has: '" +
				wildcard + "' in path '" + fullPath + "'")
		}

		// 检查通配符是否有名称
		if len(wildcard) < 2 {
			panic("wildcards must be named with a non-empty name in path '" + fullPath + "'")
		}

		// 检查这个节点是否有已经存在的子节点
		// 如果我们在这里插入通配符,这些子节点将无法访问
		if len(n.children) > 0 {
			panic("wildcard segment '" + wildcard +
				"' conflicts with existing children in path '" + fullPath + "'")
		}

		if wildcard[0] == ':' { // param
			if i > 0 {
				// 在当前通配符之前插入前缀
				n.path = path[:i]
				path = path[i:]
			}

			n.wildChild = true
			child := &node{
				nType:     param,
				path:      wildcard,
				maxParams: numParams,
				fullPath:  fullPath,
			}
			n.children = []*node{child}
			n = child
			n.priority++
			numParams--

			// 如果路径没有以通配符结束
			// 那么将有另一个以'/'开始的非通配符子路径。
			if len(wildcard) < len(path) {
				path = path[len(wildcard):]

				child := &node{
					maxParams: numParams,
					priority:  1,
					fullPath:  fullPath,
				}
				n.children = []*node{child}
				n = child  // 继续下一轮循环
				continue
			}

			// 否则我们就完成了。将处理函数插入新叶子中
			n.handlers = handlers
			return
		}

		// catchAll
		if i+len(wildcard) != len(path) || numParams > 1 {
			panic("catch-all routes are only allowed at the end of the path in path '" + fullPath + "'")
		}

		if len(n.path) > 0 && n.path[len(n.path)-1] == '/' {
			panic("catch-all conflicts with existing handle for the path segment root in path '" + fullPath + "'")
		}

		// currently fixed width 1 for '/'
		i--
		if path[i] != '/' {
			panic("no / before catch-all in path '" + fullPath + "'")
		}

		n.path = path[:i]

		// 第一个节点:路径为空的catchAll节点
		child := &node{
			wildChild: true,
			nType:     catchAll,
			maxParams: 1,
			fullPath:  fullPath,
		}
		// 更新父节点的maxParams
		if n.maxParams < 1 {
			n.maxParams = 1
		}
		n.children = []*node{child}
		n.indices = string('/')
		n = child
		n.priority++

		// 第二个节点:保存变量的节点
		child = &node{
			path:      path[i:],
			nType:     catchAll,
			maxParams: 1,
			handlers:  handlers,
			priority:  1,
			fullPath:  fullPath,
		}
		n.children = []*node{child}

		return
	}

	// 如果没有找到通配符,只需插入路径和句柄
	n.path = path
	n.handlers = handlers
	n.fullPath = fullPath
}
2
3
4
5
6
7
8
9
10
11
12
13
14
15
16
17
18
19
20
21
22
23
24
25
26
27
28
29
30
31
32
33
34
35
36
37
38
39
40
41
42
43
44
45
46
47
48
49
50
51
52
53
54
55
56
57
58
59
60
61
62
63
64
65
66
67
68
69
70
71
72
73
74
75
76
77
78
79
80
81
82
83
84
85
86
87
88
89
90
91
92
93
94
95
96
97
98
99
100
101
102
103
104
105
106
107
108
109
110
111
112
113
114
115
116
117
118
119
# 04.第四步: 启动
- 通过调用
net/http来启动服务,由于engine实现了ServeHTTP方法 - 只需要直接传
engine对象就可以完成初始化并启动
r.Run()
func (engine *Engine) Run(addr ...string) (err error) {
	defer func() { debugPrintError(err) }()
	address := resolveAddress(addr)
	debugPrint("Listening and serving HTTP on %s\n", address)
	err = http.ListenAndServe(address, engine)    // gin使用net/http模块
	return
}
func ListenAndServe(addr string, handler Handler) error {
	server := &Server{Addr: addr, Handler: handler}
	return server.ListenAndServe()
}
//来自 net/http 定义的接口,只要实现了这个接口就可以作为处理请求的函数
type Handler interface {
	ServeHTTP(ResponseWriter, *Request)
}
//实现了ServeHTTP方法
func (engine *Engine) ServeHTTP(w http.ResponseWriter, req *http.Request) {
	c := engine.pool.Get().(*Context)
	c.writermem.reset(w)
	c.Request = req
	c.reset()
	engine.handleHTTPRequest(c)
	engine.pool.Put(c)
}
2
3
4
5
6
7
8
9
10
11
12
13
14
15
16
17
18
19
20
21
22
23
24
25
# 05.第五步: 处理请求
- 这里只需要留意
handleHTTPRequest(c *Context)方法就好了 - 通过请求方法和路由找到相对应的树节点,获取储存的
[]HandlerFunc列表,通过调用c.Next()处理请求 - 通过不停的移动下标递归,最后完成处理返回结果
func (engine *Engine) handleHTTPRequest(c *Context) {
	...
	// engine.trees:请求方法树,负责存储路由和handle方法的映射,采用类似字典树的结构
	t := engine.trees
	for i, tl := 0, len(t); i < tl; i++ {
		...
		// Find route in tree
		value := root.getValue(rPath, c.Params, unescape)
		if value.handlers != nil {
			c.handlers = value.handlers
			c.Params = value.params
			c.fullPath = value.fullPath
			c.Next()
			c.writermem.WriteHeaderNow()
			return
		}
		...
	}
	...
}

//这里挺巧妙的,通过不停的移动下标递归,最后完成处理返回结果
func (c *Context) Next() {
	c.index++
	for c.index < int8(len(c.handlers)) {
		c.handlers[c.index](c)
		c.index++
	}
}
2
3
4
5
6
7
8
9
10
11
12
13
14
15
16
17
18
19
20
21
22
23
24
25
26
27
28
29
# 06.参考博客
- Go源码阅读】(十):Go语言Web框架GIN源码阅读
https://www.bilibili.com/video/BV1ap4y197Qj?from=search&seid=5844526642048212379 (opens new window)
https://jiajunhuang.com/articles/2018_03_16-gin_source_code.md.html (opens new window)
- Go源码阅读】(十一):Golang Web框架GIN路由/httprouter源码阅读
https://www.bilibili.com/video/BV1xf4y1m7bW?from=search&seid=1034343815651857298 (opens new window)
https://jiajunhuang.com/articles/2020_05_09-httprouter.md.html (opens new window)
- 思维导图
https://www.processon.com/view/link/5f4b70c2079129356ec5cb70#map (opens new window)
- 七米
https://www.liwenzhou.com/posts/Go/read_gin_sourcecode/#autoid-0-1-1 (opens new window)