 04.七牛云上传js实现方法
# 1.七牛云上传前台页面
https://www.cnblogs.com/xiaonq/p/12290151.html
# 1.1 安装相关包
npm install --save jquery@1.12.1 # 安装jquery
1
# 1.2index.html引入qiniu.min.js
<!DOCTYPE html>
<html>
  <head>
    <meta charset="utf-8">
    <meta name="viewport" content="width=device-width,initial-scale=1.0">
    <title>qiniu_vue</title>
    <script src="./static/qiniu.min.js"></script>
  </head>
  <body>
    <div id="app"></div>
    <!-- built files will be auto injected -->
  </body>
</html>
1
2
3
4
5
6
7
8
9
10
11
12
13
2
3
4
5
6
7
8
9
10
11
12
13
# 1.3 新建components\QnUpload.vue上传视频页面
<template>
  <div>
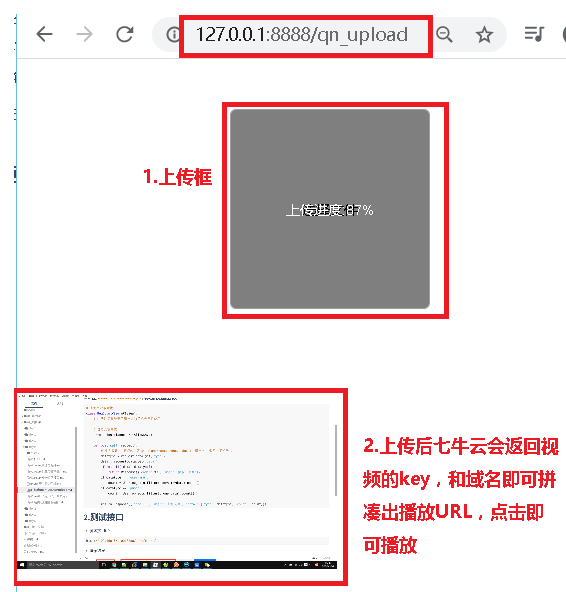
    <!-- 1.上传时的点击框  -->
    <div id="container">
      <div>
        <div id="uploadImage">选择文件{{uptoken}}</div>
        <div class="upload-progress"></div>
      </div>
    </div>

    <!-- 2.测试上传成功后播放功能  -->
    <div v-show="true">
      <video id="video"  width="320" height="240" :src="qn_url" controls="controls" autoplay="autoplay" muted loop="loop" >
        您的浏览器不支持 video 标签。
      </video>
    </div>
  </div>
</template>

<script>
  import $ from 'jquery'
  import { qn_token_get } from './axios_api/api'

  export default {
    data() {
      return {
        uptoken: '',                                     // 从django后端获取的七牛云认证token
        qn_url: 'http://qi11dgv17.hn-bkt.clouddn.com/',  // 七牛云给的空间测试域名
      };
    },
    methods: {
      // 1.获取七牛云认证token
      getQiniuToken: function (callback){
        qn_token_get({ }).then(resp => {
          // debugger
          this.uptoken = resp.data.uptoken;
          callback()  // callback 出入的是回调函数 initQiniu() 用来初始化Qiniu.uploader()
        }).catch( err=>{
          console.log(err,'err')
        })
      },

      // 2.初始化七牛云对象
      initQiniu: function () {
        var ths = this   // 避免七牛云对象覆盖vue的this对象,在这里提前赋值
        var uploader = Qiniu.uploader({
          disable_statistics_report: false,                                   // 禁止自动发送上传统计信息到七牛,默认允许发送
          runtimes: 'html5,flash,html4',                                      // 上传模式,依次退化
          browse_button: 'uploadImage',                                       // 上传选择的点选按钮,必需
          container: 'container',                                             // 上传区域DOM ID,默认是browser_button的父元素
          max_file_size: '500mb',                                             // 最大文件体积限制
          flash_swf_url: 'Moxie.swf',                                         // 引入flash,相对路径
          dragdrop: false,                                                    // 关闭可拖曳上传
          chunk_size: '4mb',                                                  // 分块上传时,每块的体积
          multi_selection: !(moxie.core.utils.Env.OS.toLowerCase() === "ios"),
          uptoken: this.uptoken,     // 在初始化时,uptoken,uptoken_url,uptoken_func三个参数中必须有一个被设置,uptoken是上传凭证,由其他程序生成;uptoken_url是提供了获取上传凭证的地址,如果需要定制获取uptoken的过程则可以设置uptoken_func;其优先级为uptoken > uptoken_url > uptoken_func
          // uptoken_url: 'http://127.0.0.1:8000/uptoken',                                                 // 在初始化时,uptoken,uptoken_url,uptoken_func三个参数中必须有一个被设置,uptoken是上传凭证,由其他程序生成;uptoken_url是提供了获取上传凭证的地址,如果需要定制获取uptoken的过程则可以设置uptoken_func;其优先级为uptoken > uptoken_url > uptoken_func
          // uptoken:'q06bq54Ps5JLfZyP8Ax-qvByMBdu8AoIVJpMco2m:kyTiuN6GBUpfNt1nJIA7C8CCStY=:eyJzY29wZSI6IjEzMTIzMTIzMTIzIiwiZGVhZGxpbmUiOjE1NzY0MTM3MTB9',
          domain: 'redinnovation.s3-cn-north-1.qiniucs.com',               // bucket域名,下载资源时用到,必需
          get_new_uptoken: false,                                              // 设置上传文件的时候是否每次都重新获取新的uptoken
          auto_start: true,                                                   // 选择文件后自动上传,若关闭需要自己绑定事件触发上传
          max_retries: 3,                                                     // 上传失败最大重试次数
          save_key: true,
          resize: {                                                           // 想限制上传图片尺寸,直接用resize这个属性
            width: 300,
            height: 300
          },
          init: {
            'FilesAdded': function(up, files) {                             // 文件添加进队列后,处理相关的事情
              plupload.each(files, function(file) {
                console.log(file)
              });
            },
            'BeforeUpload': function(up, file) {                            // 每个文件上传前,处理相关的事情
              console.log("开始上传之前");
              $(".upload-progress").show();
            },
            'UploadProgress': function(up, file) {                          // 每个文件上传时,处理相关的事情
              console.log("上传中");
              $(".upload-progress").html("上传进度:"+file.percent + "%");
            },
            'FileUploaded': function(up, file, info) {                       // 每个文件上传成功后,处理相关的事情
              console.log("上传成功");
              console.log(info,4567890);
              $(".upload-progress").hide();
              var img = new Image();                                      //创建一个Image对象,实现图片的预下载
              var res = JSON.parse( info.response )
              // debugger
              console.log(ths.qn_url)
              ths.qn_url = ths.qn_url + res.key;
            },
            'Error': function(up, err, errTip) {
              console.log("上传出错")
            },
            'UploadComplete': function() {
              //队列文件处理完毕后,处理相关的事情
            }
          }
        });
      }
    },
    mounted(){
      this.getQiniuToken(() => {
        this.initQiniu()  // 将initQiniu()当做callback回调函数传入给getQiniuToken函数
      })
    }
  }
</script>

<style>
  #container{
    width:200px;
    height:200px;
    border:1px solid #9d9d9d;
    border-radius: 6px;
    margin:50px auto;
    position: relative;
    overflow: hidden;
  }
  .upload-progress{
    width:100%;
    height:100%;
    position: absolute;
    top:0;
    left:0;
    background: rgba(0,0,0,0.5);
    z-index: 5;
    color:#fff;
    line-height: 200px;
    text-align: center;
    display: none;
  }
  #uploadImage{
    width:100%;
    height:100%;
    position: absolute;
    top:0;
    left:0;
    z-index: 2;
    text-align: center;
    line-height: 200px;
    cursor: pointer;
  }
  #container img{
    width:100%;
    position: absolute;
    top:0;
    left:0;
    z-index: 1;
  }
</style>
1
2
3
4
5
6
7
8
9
10
11
12
13
14
15
16
17
18
19
20
21
22
23
24
25
26
27
28
29
30
31
32
33
34
35
36
37
38
39
40
41
42
43
44
45
46
47
48
49
50
51
52
53
54
55
56
57
58
59
60
61
62
63
64
65
66
67
68
69
70
71
72
73
74
75
76
77
78
79
80
81
82
83
84
85
86
87
88
89
90
91
92
93
94
95
96
97
98
99
100
101
102
103
104
105
106
107
108
109
110
111
112
113
114
115
116
117
118
119
120
121
122
123
124
125
126
127
128
129
130
131
132
133
134
135
136
137
138
139
140
141
142
143
144
145
146
147
148
149
150
151
# 1.4 router\index.js 引入路由
import qn_upload from '@/components/QnUpload'
var routes = [
    { path: '/qn_upload/', name: 'qn_upload', component: qn_upload,},
]
1
2
3
4
2
3
4
# 1.5 axios_api\api.js中引入后端路由
export const qn_token_get = p => axios_get("/oauth/qntoken/", p) // 获取七牛云token
1
# 2.测试页面结果

上次更新: 2024/3/13 15:35:10
