07.消息广播
# 01.广播说明
1.之前的例子都基本都是1对1的消息发送和接收,即消息只能发送到指定的queue里
2.但有些时候你想让你的消息被所有的Queue收到,类似广播的效果,这时候就要用到exchange了
3.Exchange在定义的时候是有类型的,以决定到底是哪些Queue符合条件,可以接收消息
1)fanout:所有绑定(bind)到此exchange的queue都可以接收消息(可以有多个exchange)
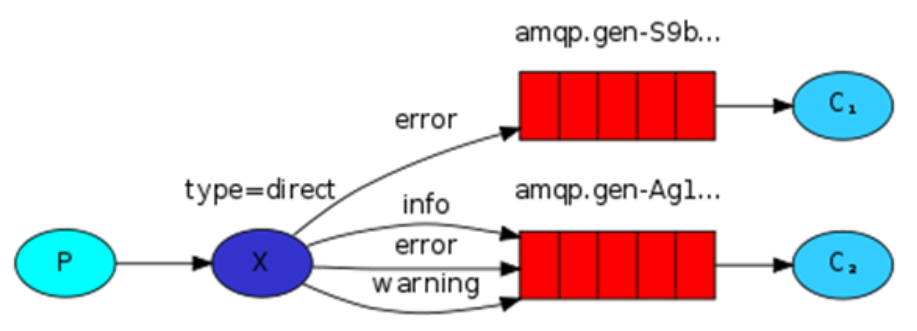
2)direct:通过routingKey和exchange决定的那个唯一的queue可以接收消息
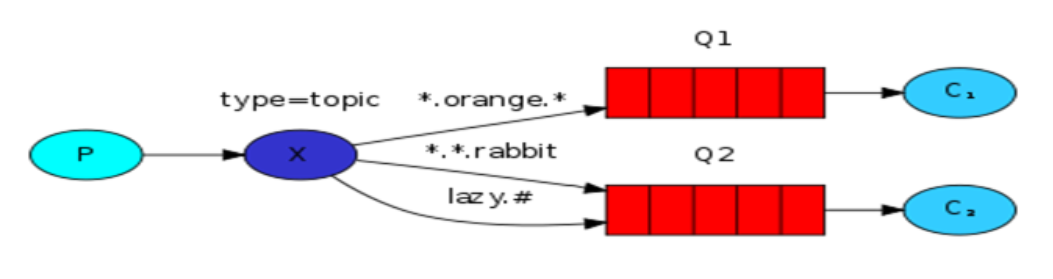
3)topic:所有符合routingKey(此时可以是一个表达式)的routingKey所bind的queue可以接收消息
# 02.第一种:fanout
fanout 将消息发送给所有绑定到exchange转发器的队列(第一种)注:在广播的exchange中如果生产者发送消息时有消费者不在,过后消费者再运行也不会收到(收音机)
# 2.1 fanout说明
1.发布方(生产者)是不需要申明queue的,仅需要有一个exchange,类型是fanout
2.消费者也要将在生产者中定义的exchange再定义一遍
3.通过channel.queue_bind将需要的queue绑定到exchange中(queue=queue_name指定绑定的queue的名字)
4.下面就一样了,通过exchange将消息发送到所有绑定的queue,消费者然后就可以从队列中收取数据了
可以看到,两个消费者都可以收到消息

# 2.2 生产者
# -*- coding: utf-8 -*-
import pika

class Sender(object):
	def __init__(self):
		# 远程rabbitmq服务的配置信息
		self.username = 'admin'  # 指定远程rabbitmq的用户名密码
		self.pwd = '123456'
		self.ip_addr = '192.168.56.66'
		self.port_num = 5672
		self.connection = None
		self.channel = None

	def create_connect(self):
		# 消息队列服务的连接和队列的创建
		credentials = pika.PlainCredentials(self.username, self.pwd)
		connection = pika.BlockingConnection(pika.ConnectionParameters(self.ip_addr, self.port_num, '/', credentials))
		channel = connection.channel()   # 建立rabbitmq协议的通道
		# 1 标注出exchange类型为fanout,所有绑定(bind)到此exchange的queue都可以接收消息
		channel.exchange_declare(exchange='logs',
								 exchange_type='fanout')
		self.connection = connection
		self.channel = channel
		return channel

	def send(self,msg=None):
		self.create_connect()
		msg = msg if msg else 'Hello World!'
		channel = self.create_connect()
		# 1 因为这里是fanout广播,所以就不用声明queue
		self.channel.basic_publish(exchange='logs',
							  routing_key='',  # 这里不必指定收消息的queue
							  body=msg)
		print(" [x] Sent %r" % msg)
		print(" [x] Sent %s"%msg)
		self.connection.close()  # 发送完毕后关掉

if __name__ == '__main__':
	send = Sender()
	send.send('aaaaaaaaa')
2
3
4
5
6
7
8
9
10
11
12
13
14
15
16
17
18
19
20
21
22
23
24
25
26
27
28
29
30
31
32
33
34
35
36
37
38
39
40
# 2.3 消费者
# -*- coding: utf-8 -*-
import pika,time

class Receiver(object):
	def __init__(self):
		# 远程rabbitmq服务的配置信息
		self.username = 'admin'  # 指定远程rabbitmq的用户名密码
		self.pwd = '123456'
		self.ip_addr = '192.168.56.66'
		self.port_num = 5672
		self.connection = None
		self.channel = None

	def create_connect(self):
		# 消息队列服务的连接和队列的创建
		credentials = pika.PlainCredentials(self.username, self.pwd)
		connection = pika.BlockingConnection(pika.ConnectionParameters(self.ip_addr, self.port_num, '/', credentials))
		channel = connection.channel()   # 建立rabbitmq协议的通道
		# 声明队列queue
		channel.queue_declare(queue='hello',durable=True)
		self.connection = connection
		self.channel = channel

	def run(self):
		self.create_connect()
		self.channel.exchange_declare(exchange='logs',
								 exchange_type='fanout')
		# 1 不指定queue名字,rabbit会随机分配一个名字,exclusive=True会在使用此queue的消费者断开后,自动将queue删除
		# 2 发送端没有声明queue为什么接收端要声明queue:指定让装发器发送给那些queue
		# 3 这里不指定具体的队列名字是因为这里的queue仅仅是为了收广播的,如果不收了这个queue就没用了
		# 4 这个queue的对象是result,queue真正的名字其实是result.method.queue(随机的queue名字)
		result = self.channel.queue_declare('',exclusive=True)
		queue_name = result.method.queue

		# 1 将queue绑定到转发器exchange='logs'中,让队列queue知道从哪个转法器去接收数据,logs是转法器名字
		# 2 这里声明queue=queue_name 是指定转发器要将消息发送给那些队列,然后消费者再从queue中收
		self.channel.queue_bind(exchange='logs',
						   queue=queue_name)

		self.channel.basic_consume(queue_name,self.callback,False)

		print(' [*] Waiting for messages. To exit press CTRL+C')
		self.channel.start_consuming()  # 开始消息,是个死循环,一直监听收消息

	# 收到消息后,回调函数处理任务
	def callback(self, ch, method, properties, body):
		'''
		:param ch:  ch是刚刚声明的channel = connection.channel()对象
		:param method:   method是指定要把消息发送给那些queue的信息
		:param properties: 其他属性
		:param body: 收到的消息
		'''
		print(" [x] Received %r" % body)
		ch.basic_ack(delivery_tag=method.delivery_tag)
		# 如果去掉no_ack = False 必须加ch.basic_ack,让消费者收到消息主动发送确认
		# 否则消费者如果收到消息后断掉,那么这条消息依然会发送给另一个,再断开又发送下一个,无限循环


if __name__ == '__main__':
	receive = Receiver()
	receive.run()
2
3
4
5
6
7
8
9
10
11
12
13
14
15
16
17
18
19
20
21
22
23
24
25
26
27
28
29
30
31
32
33
34
35
36
37
38
39
40
41
42
43
44
45
46
47
48
49
50
51
52
53
54
55
56
57
58
59
60
61
# 03.第二种:direct
- 有选择的接收消息(exchange type=direct) (第二种)
# 3.1 direct说明
- 作用: 接收者可以过滤,只接收自己想要的消息
- 1.执行生产者发送命令
(django2.2) C:\tmp\celery_test\rb>  python  send.py  warning  from tom
# 这里生产者指定发送的消息时warning级别
2
- 2.执行消费者接收命令
# 注2:这里只有运行消费者指定收取级别是warning级别的才会收到数据,其他级别都无法收到from tom这条消息
(django2.2) C:\tmp\celery_test\rb> python receive.py   info   warning
ser ['info', 'warning']
 [*] Waiting for messages. To exit press CTRL+C
 [x] Received b'from tom'
 [x] Received b'from tom'
2
3
4
5
6
# 3.2 生产者
# -*- coding: utf-8 -*-
import pika

class Sender(object):
	def __init__(self):
		# 远程rabbitmq服务的配置信息
		self.username = 'admin'  # 指定远程rabbitmq的用户名密码
		self.pwd = '123456'
		self.ip_addr = '192.168.56.66'
		self.port_num = 5672
		self.connection = None
		self.channel = None

	def create_connect(self):
		# 消息队列服务的连接和队列的创建
		credentials = pika.PlainCredentials(self.username, self.pwd)
		connection = pika.BlockingConnection(pika.ConnectionParameters(self.ip_addr, self.port_num, '/', credentials))
		channel = connection.channel()   # 建立rabbitmq协议的通道
		channel.exchange_declare(exchange='direct_logs',  # exchange名字可以随便取
								 exchange_type='direct')  # exchange模式,是direct
		self.connection = connection
		self.channel = channel

	def send(self,severity=None, msg=None):
		channel = self.create_connect()
		# 开始发消息
		self.channel.basic_publish(exchange='direct_logs',
							  routing_key=severity,  # 定义将消息都发到这个级别里面
							  body=message)
		print(" [x] Sent %r" % msg)
		print(" [x] Sent %s"%msg)
		self.connection.close()  # 发送完毕后关掉

if __name__ == '__main__':
	import sys
	send = Sender()
	severity = sys.argv[1] if len(sys.argv) > 1 else 'info'
	message = ' '.join(sys.argv[2:]) or 'Hello World!'
	send.send(severity, message)
2
3
4
5
6
7
8
9
10
11
12
13
14
15
16
17
18
19
20
21
22
23
24
25
26
27
28
29
30
31
32
33
34
35
36
37
38
39
# 3.2 消费者
# -*- coding: utf-8 -*-
import pika,time,sys

class Receiver(object):
	def __init__(self):
		# 远程rabbitmq服务的配置信息
		self.username = 'admin'  # 指定远程rabbitmq的用户名密码
		self.pwd = '123456'
		self.ip_addr = '192.168.56.66'
		self.port_num = 5672
		self.connection = None
		self.channel = None

	def create_connect(self):
		# 消息队列服务的连接和队列的创建
		credentials = pika.PlainCredentials(self.username, self.pwd)
		connection = pika.BlockingConnection(pika.ConnectionParameters(self.ip_addr, self.port_num, '/', credentials))
		channel = connection.channel()   # 建立rabbitmq协议的通道
		# 声明队列queue
		channel.queue_declare(queue='hello',durable=True)
		self.connection = connection
		self.channel = channel

	def run(self):
		self.create_connect()
		self.channel.exchange_declare(exchange='direct_logs',
                         exchange_type='direct')
		result = self.channel.queue_declare('',exclusive=True)
		queue_name = result.method.queue

		# 1 serverities就是将你执行生产者脚本时后面跟的参数,以列表形式返回
		# 2 如果没有参数就会报错就退出了(参数可以是info,warning。。)
		# python direct_consumer.py   info   warning
		severities = sys.argv[1:]
		if not severities:
			sys.stderr.write("Usage: %s [info] [warning] [error]\n" % sys.argv[0])
			sys.exit(1)
		print('ser', severities)

		# 1 循环列表所有传入的参数,将每一个参数都绑定到这个exchange中
		# 2 queue=queue_name是上面随机生成的队列名字
		# 3 routing_key=severity指定所有级别为severity参数指定级别的全部都收
		# 4 客户端之所以可以收所有级别的queue是因为这里都绑定各个级别的queue

		for severity in severities:
			self.channel.queue_bind(exchange='direct_logs',
							   queue=queue_name,
							   routing_key=severity)


		self.channel.basic_consume(queue_name,self.callback,False)
		print(' [*] Waiting for messages. To exit press CTRL+C')
		self.channel.start_consuming()  # 开始消息,是个死循环,一直监听收消息

	# 收到消息后,回调函数处理任务
	def callback(self, ch, method, properties, body):
		'''
		:param ch:  ch是刚刚声明的channel = connection.channel()对象
		:param method:   method是指定要把消息发送给那些queue的信息
		:param properties: 其他属性
		:param body: 收到的消息
		'''
		print(" [x] Received %r" % body)
		ch.basic_ack(delivery_tag=method.delivery_tag)
		# 如果去掉no_ack = False 必须加ch.basic_ack,让消费者收到消息主动发送确认
		# 否则消费者如果收到消息后断掉,那么这条消息依然会发送给另一个,再断开又发送下一个,无限循环


if __name__ == '__main__':
	receive = Receiver()
	receive.run()
2
3
4
5
6
7
8
9
10
11
12
13
14
15
16
17
18
19
20
21
22
23
24
25
26
27
28
29
30
31
32
33
34
35
36
37
38
39
40
41
42
43
44
45
46
47
48
49
50
51
52
53
54
55
56
57
58
59
60
61
62
63
64
65
66
67
68
69
70
71
# 04.topic
- RabbitMQ topic细致的消息过滤
# 4.1 topic说明
1.比如说现在有很多应用,Apache,MySQL的日志都会包含info,error等,这样如何区分
2.direct过滤是直接写死了是info,error等,而这里是用过滤条件
3.(收取生产者发送的任何消息);.error(收取所有级别为error的消息);MySQL.(收取所有以MySQL开头的消息)
4.topic和上面的direct写法上没有什么区别,仅仅需要将格式变成topic即可(type='topic')