 13.Redis的cluster配置
# 01.机器配置
VMware版本号:16.0.0
在两台机器上分别安装好Redis服务
| 系统 | IP | 运行实例端口 | Redis版本 |
|---|---|---|---|
| CentOS 7.5 | 192.168.56.65 | 7000 7001 7002 | Redis-5.0.3 |
| CentOS 7.5 | 192.168.56.66 | 7000 7001 7002 | Redis-5.0.3 |
# 02.192.168.56.65配置
- 创建conf配置文件夹
- 三个⽂件的配置区别在
port、pidfile、cluster-config-file三项
[root@k8s-node1 ~]# mkdir /root/conf/
1
# 2.1 7000.conf
[root@k8s-node1 ~]# vim /root/conf/7000.conf
port 7000
bind 192.168.56.65
daemonize yes
pidfile 7000.pid
cluster-enabled yes
cluster-config-file 7000_node.conf
cluster-node-timeout 15000
appendonly yes
1
2
3
4
5
6
7
8
9
2
3
4
5
6
7
8
9
# 2.2 7001.conf
[root@k8s-node1 ~]# vim /root/conf/7001.conf
port 7001
bind 192.168.56.65
daemonize yes
pidfile 7001.pid
cluster-enabled yes
cluster-config-file 7001_node.conf
cluster-node-timeout 15000
appendonly yes
1
2
3
4
5
6
7
8
9
2
3
4
5
6
7
8
9
# 2.3 7002.conf
[root@k8s-node1 ~]# vim /root/conf/7002.conf
port 7002
bind 192.168.56.65
daemonize yes
pidfile 7002.pid
cluster-enabled yes
cluster-config-file 7002_node.conf
cluster-node-timeout 15000
appendonly yes
1
2
3
4
5
6
7
8
9
2
3
4
5
6
7
8
9
# 2.4 启动Redis服务
[root@k8s-node1 conf]# Redis-server 7000.conf
[root@k8s-node1 conf]# Redis-server 7001.conf
[root@k8s-node1 conf]# Redis-server 7002.conf
1
2
3
2
3

# 03.192.168.56.66配置
- 创建conf配置文件夹
- 三个⽂件的配置区别在
port、pidfile、cluster-config-file三项
[root@k8s-node1 ~]# mkdir /root/conf/
1
# 2.1 7003.conf
[root@k8s-node1 ~]# vim /root/conf/7003.conf
port 7003
bind 192.168.56.66
daemonize yes
pidfile 7003.pid
cluster-enabled yes
cluster-config-file 7003_node.conf
cluster-node-timeout 15000
appendonly yes
1
2
3
4
5
6
7
8
9
2
3
4
5
6
7
8
9
# 2.2 7004.conf
[root@k8s-node1 ~]# vim /root/conf/7004.conf
port 7004
bind 192.168.56.66
daemonize yes
pidfile 7004.pid
cluster-enabled yes
cluster-config-file 7004_node.conf
cluster-node-timeout 15000
appendonly yes
1
2
3
4
5
6
7
8
9
2
3
4
5
6
7
8
9
# 2.3 7005.conf
[root@k8s-node1 ~]# vim /root/conf/7005.conf
port 7005
bind 192.168.56.66
daemonize yes
pidfile 7005.pid
cluster-enabled yes
cluster-config-file 7005_node.conf
cluster-node-timeout 15000
appendonly yes
1
2
3
4
5
6
7
8
9
2
3
4
5
6
7
8
9
# 2.4 启动Redis服务
[root@k8s-node1 conf]# Redis-server 7003.conf
[root@k8s-node1 conf]# Redis-server 7004.conf
[root@k8s-node1 conf]# Redis-server 7005.conf
1
2
3
2
3

# 04.创建集群
# 4.1 创建集群
- Redis-trib.rb是官方提供的Redis Cluster的管理工具,无需额外下载,默认位于源码包的src目录下
'''将Redis-trib.rb复制到/usr/local/bin/下,以便在任何⽬录下调⽤此命令'''
[root@k8s-node1 conf]# cp /root/Redis-5.0.3/src/Redis-trib.rb  /usr/local/bin/
1
2
2
- 但因该工具是用ruby开发的,所以需要准备相关的依赖环境
[root@k8s-node2 src]# yum -y install ruby
1
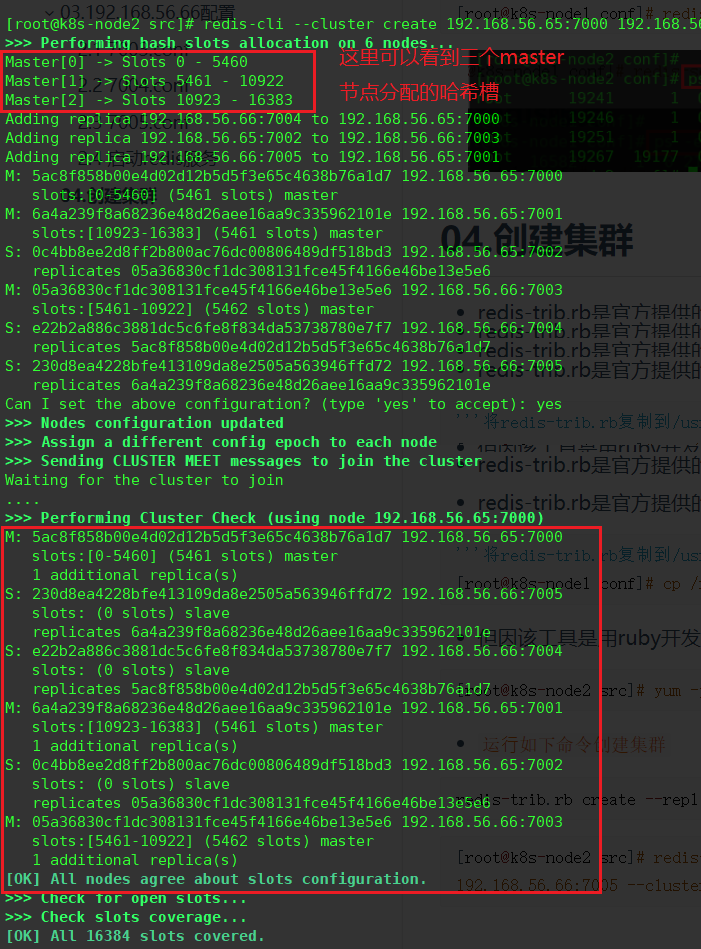
运⾏如下命令创建集群
[root@k8s-node2 src]# Redis-cli --cluster create 192.168.56.65:7000 192.168.56.65:7001 192.168.56.65:7002 192.168.56.66:7003 192.168.56.66:7004 192.168.56.66:7005 --cluster-replicas 1
1
# 4.2 查看集群创建结果
- 根据下图可以看出,当前搭建的主服务器为7000、7001、7003,对应的从服务器是7004、7005、7002
# 4.3 数据验证

- 在7002上写入数据,会自动将操作转发给7003
- 在7002和7003两台服务器中,
7003是master,master能写入
[root@k8s-node1 conf]# Redis-cli -h 192.168.56.65 -c -p 7002
192.168.56.65:7002> set name tom
-> Redirected to slot [5798] located at 192.168.56.66:7003
OK
1
2
3
4
2
3
4
- 在7003中可以看到刚刚在7002中写入的数据
[root@k8s-node1 ~]# Redis-cli -h 192.168.56.66 -c -p 7003
192.168.56.66:7003> get name
"tom"
1
2
3
2
3
- 在7000客户端去查找刚刚的数据,其实当前Redis实例没有这条数据
- 会将请求转发给了7003这个Redis进行查找
[root@k8s-node1 ~]# Redis-cli -h 192.168.56.65 -c -p 7000
192.168.56.65:7000> get name
-> Redirected to slot [5798] located at 192.168.56.66:7003
"tom"
1
2
3
4
2
3
4
# 05.Python交互
# 5.1 安装Redis-py-cluster
pip install Redis==2.10.6
pip install Redis-py-cluster==1.3.5
1
2
2
- Redis-py-cluster源码地址https://github.com/Grokzen/Redis-py-cluster
# 5.2 python使用Redis集群
from Rediscluster import *
if __name__ == '__main__':
  try:
    # 构建所有的节点,Redis会使⽤CRC16算法,将键和值写到某个节点上
    startup_nodes = [
        {'host': '192.168.56.65', 'port': '7000'},
        {'host': '192.168.56.65', 'port': '7001'},
        {'host': '192.168.56.65', 'port': '7002'},
        {'host': '192.168.56.66', 'port': '7003'},
        {'host': '192.168.56.66', 'port': '7004'},
        {'host': '192.168.56.66', 'port': '7005'},
    ]
    # 构建StrictRedisCluster对象
    src=StrictRedisCluster(startup_nodes=startup_nodes,decode_responses=True)
    # 设置键为name、值为itheima的数据
    result=src.set('name','itheima')
    print(result)
    # 获取键为name
    name = src.get('name')
    print(name)
  except Exception as e:
    print(e)
'''
打印结果:
True
itheima
'''
1
2
3
4
5
6
7
8
9
10
11
12
13
14
15
16
17
18
19
20
21
22
23
24
25
26
27
2
3
4
5
6
7
8
9
10
11
12
13
14
15
16
17
18
19
20
21
22
23
24
25
26
27
# 06.django中使用
# 6.1 Requirement
Python 3.0+
Django>=1.9.6
Redis>=2.10.5
Redis-py-cluster>=1.2.0
msgpack-python>=0.4.7
# 6.2 How to install
$python setup.py install
or
$pip install django-Redis-cluster
1
2
3
2
3
# 6.3 Django Settings
CACHES = {
    'default': {
        'BACKEND': 'django_Redis_cluster.cache.RedisClusterCache',
        "LOCATION": [
            "Redis://127.0.0.1:7000/0",
            "Redis://127.0.0.1:7001/0",
            "Redis://127.0.0.1:7002/0",
        ],
        'OPTIONS': {
            "CLIENT_CLASS": "django_Redis_cluster.client.DefaultClient",
        }
    }
}
1
2
3
4
5
6
7
8
9
10
11
12
13
2
3
4
5
6
7
8
9
10
11
12
13