 02.安装zabbix-server
# 01.安装zabbix server
# 1.1 环境检查
[root@m01 ~]# cat /etc/redhat-release
CentOS Linux release 7.4.1708 (Core)

[root@m01 ~]# uname -r
3.10.0-693.el7.x86_64

[root@m01 ~]# getenforce
Disabled

[root@m01 ~]# systemctl status firewalld.service
firewalld.service - firewalld - dynamic firewall daemon
Loaded: loaded (/usr/lib/systemd/system/firewalld.service; disabled; vendor preset: enabled)
Active: inactive (dead)
Docs: man:firewalld(1)
1
2
3
4
5
6
7
8
9
10
11
12
13
14
2
3
4
5
6
7
8
9
10
11
12
13
14
# 1.2 下载安装zabbix-release-3.4的server
- 下载地址:http://repo.zabbix.com/zabbix/3.4/rhel/7/x86_64/找到对应版本,比如下面的安装地址
[root@localhost ~]# rpm  -ivh  http://repo.zabbix.com/zabbix/3.4/rhel/7/x86_64/zabbix-release-3.4-1.el7.centos.noarch.rpm
[root@localhost ~]# rpm -ql  zabbix-release    # 查看zabbix-release安装了哪些包(其中就有/etc/yum.repos.d/zabbix.repo)
[root@localhost ~]# yum  make  cache        # 就是把服务器的包信息下载到本地电脑缓存起来
1
2
3
2
3
# 1.3 安装Zabbix部署包
[root@localhost ~]# yum -y install zabbix-server-mysql zabbix-web-mysql
1
# 1.4 安装server和agent包
- 我们测试自己监控自己所以要安装下面两个包(装zabbix)
[root@localhost ~]# yum -y install zabbix-server zabbix-agent
1
# 1.5 安装zabbix需要用的数据库
[root@localhost ~]# yum -y install mariadb-server
1
# 1.6 初始化数据库
- 1)在MySQL上安装Zabbix数据库和用户:
- 2)参考地址:https://www.zabbix.com/documentation/3.4/manual/appendix/install/db_scripts
[root@localhost ~]#  systemctl start mariadb             # 开启数据库
[root@localhost ~]#  mysql -uroot –p                 # 登录数据库:没有密码
[root@localhost ~]#  create database zabbix character set utf8 collate utf8_bin;              # 创建数据库
[root@localhost ~]#  grant all privileges on zabbix.* to zabbix@localhost identified by 'zabbix';   # 创建zabbix用户密码zabbix,并授权
[root@localhost ~]#  FLUSH PRIVILEGES;
1
2
3
4
5
2
3
4
5
# 1.7 导入数据库
[root@localhost ~]#  cd /usr/share/doc/zabbix-server-mysql-3.4.8/
[root@localhost ~]#  zcat create.sql.gz | mysql -uroot zabbix -p       # 将表导入到刚刚创建的zabbix数据库中
1
2
2
# 1.8 修改zabbix_server.conf
[root@localhost ~]#  vim /etc/zabbix/zabbix_server.conf

DBHost=localhost
DBName=zabbix
DBPassword=zabbix
DBPort=3306
1
2
3
4
5
6
2
3
4
5
6
# 1.9 启动zabbix服务
# 1、关闭防火墙
[root@localhost ~]#  vim /etc/selinux/config      #关闭防火墙
SELINUX=disabled
setenforce 0
systemctl stop firewalld
# 2、启动zabbix
[root@localhost ~]#  systemctl start zabbix-server
[root@localhost ~]#  systemctl status zabbix-server
1
2
3
4
5
6
7
8
2
3
4
5
6
7
8
# 1.10 编辑Zabbix前端的PHP配置
[root@localhost ~]#  vim /etc/httpd/conf.d/zabbix.conf    # 将时区改成上海
php_value date.timezone Asia/ShangHai
systemctl start httpd                          # 开启Apache服务
systemctl status httpd
1
2
3
4
2
3
4
# 1.11 页面访问并进行设置
- 配置完成后即可通过页面访问并进行设置

# 02.脚本安装zabbix
# 2.1 Server端快速安装脚本
#!/bin/bash
#clsn

#设置解析 注意:网络条件较好时,可以不用自建yum源
# echo '10.0.0.1 mirrors.aliyuncs.com mirrors.aliyun.com repo.zabbix.com' >> /etc/hosts

#安装zabbix源、aliyun YUM源
curl -o /etc/yum.repos.d/CentOS-Base.repo http://mirrors.aliyun.com/repo/Centos-7.repo
curl -o /etc/yum.repos.d/epel.repo http://mirrors.aliyun.com/repo/epel-7.repo
rpm -ivh http://repo.zabbix.com/zabbix/3.0/rhel/7/x86_64/zabbix-release-3.0-1.el7.noarch.rpm

#安装zabbix
yum install -y zabbix-server-mysql zabbix-web-mysql

#安装启动 mariadb数据库
yum install -y  mariadb-server
systemctl start mariadb.service

#创建数据库
mysql -e 'create database zabbix character set utf8 collate utf8_bin;'
mysql -e 'grant all privileges on zabbix.* to zabbix@localhost identified by "zabbix";'

#导入数据
zcat /usr/share/doc/zabbix-server-mysql-3.0.13/create.sql.gz|mysql -uzabbix -pzabbix zabbix

#配置zabbixserver连接mysql
sed -i.ori '115a DBPassword=zabbix' /etc/zabbix/zabbix_server.conf

#添加时区
sed -i.ori '18a php_value date.timezone  Asia/Shanghai' /etc/httpd/conf.d/zabbix.conf

#解决中文乱码
yum -y install wqy-microhei-fonts
\cp /usr/share/fonts/wqy-microhei/wqy-microhei.ttc /usr/share/fonts/dejavu/DejaVuSans.ttf

#启动服务
systemctl start zabbix-server
systemctl start httpd

#写入开机自启动
chmod +x /etc/rc.d/rc.local
cat >>/etc/rc.d/rc.local<<EOF
systemctl start mariadb.service
systemctl start httpd
systemctl start zabbix-server
EOF

#输出信息
echo "浏览器访问 http://`hostname -I|awk '{print $1}'`/zabbix"
1
2
3
4
5
6
7
8
9
10
11
12
13
14
15
16
17
18
19
20
21
22
23
24
25
26
27
28
29
30
31
32
33
34
35
36
37
38
39
40
41
42
43
44
45
46
47
48
49
2
3
4
5
6
7
8
9
10
11
12
13
14
15
16
17
18
19
20
21
22
23
24
25
26
27
28
29
30
31
32
33
34
35
36
37
38
39
40
41
42
43
44
45
46
47
48
49
# 2.2 客户端快速部署脚本
#!/bin/bash
#clsn

#设置解析
echo '10.0.0.1 mirrors.aliyuncs.com mirrors.aliyun.com repo.zabbix.com' >> /etc/hosts

#安装zabbix源、aliyu nYUM源
curl -o /etc/yum.repos.d/CentOS-Base.repo http://mirrors.aliyun.com/repo/Centos-7.repo
curl -o /etc/yum.repos.d/epel.repo http://mirrors.aliyun.com/repo/epel-7.repo
rpm -ivh http://repo.zabbix.com/zabbix/3.0/rhel/7/x86_64/zabbix-release-3.0-1.el7.noarch.rpm

#安装zabbix客户端
yum install zabbix-agent -y
sed -i.ori 's#Server=127.0.0.1#Server=172.16.1.61#' /etc/zabbix/zabbix_agentd.conf
systemctl start  zabbix-agent.service

#写入开机自启动
chmod +x /etc/rc.d/rc.local
cat >>/etc/rc.d/rc.local<<EOF
systemctl start  zabbix-agent.service
EOF
1
2
3
4
5
6
7
8
9
10
11
12
13
14
15
16
17
18
19
20
21
2
3
4
5
6
7
8
9
10
11
12
13
14
15
16
17
18
19
20
21
# 03.zabbix server基本操作
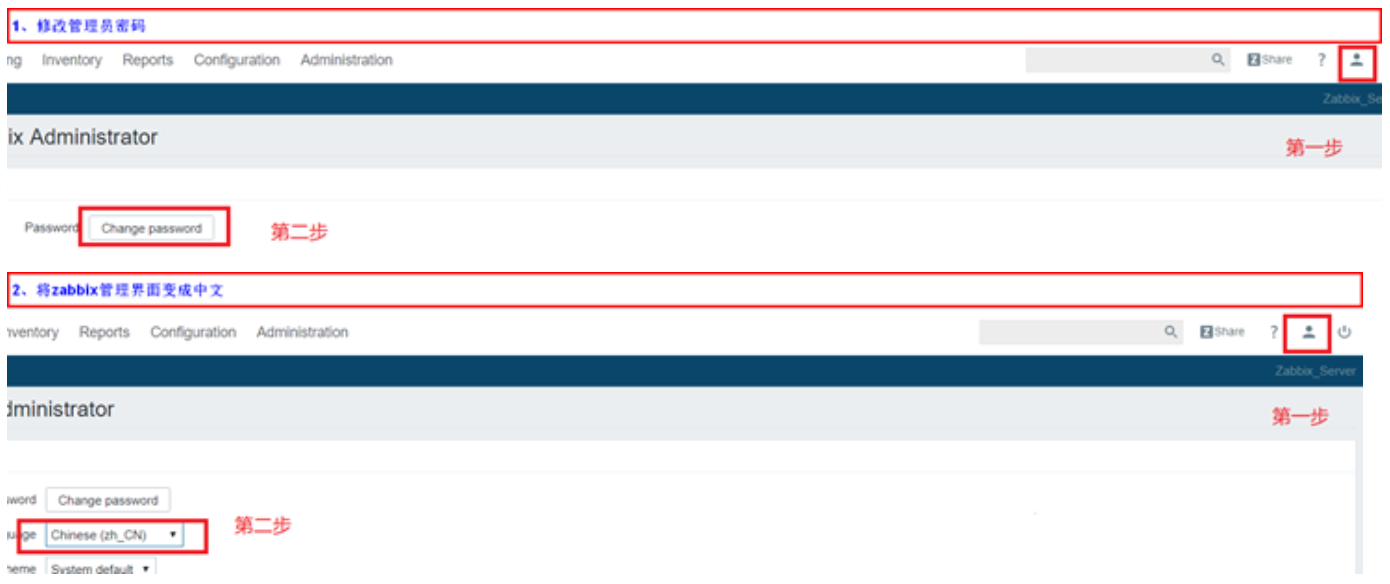
# 3.1 登录和配置用户

# 3.2 将server添加到监控中
- 1. 修改agent配置文件
[root@localhost ~]#  vim /etc/zabbix/zabbix_agentd.conf
Server=1.1.1.3                   # 配置zabbix server地址
[root@localhost ~]#  systemctl restart zabbix-agent      # 重启zabbix-agent使配置生效
1
2
3
2
3
- 2. 在页面上添加主机

- 3. 排除zabbix agent失败方法
'''1、检查agent指向是否是server地址 '''
[root@linux-node1 ~]# vim /etc/zabbix/zabbix_agentd.conf
Server=192.168.56.14

'''2、检查防火墙'''
[root@linux-node1 ~]# getenforce          # 检查selinux是否关闭
[root@linux-node1 ~]# systemctl status firewalld    # 检查防火墙是否关闭

'''3、查看zabbix日志'''
[root@linux-node1 ~]# tail -f /var/log/zabbix/zabbix_agentd.log
1
2
3
4
5
6
7
8
9
10
2
3
4
5
6
7
8
9
10
上次更新: 2024/3/13 15:35:10
